Sadly, this just isn't so. I'm not even a particularly good jumper. However, I recently threw out the idea of writing some posts answering the "How'd you do that?" type questions I sometimes get about my daily photos. I thought I'd start by explaining how I make myself appear to float (or levitate, as you'll see it called on sites like flickr), since that's probably the most confusing technique I use to people who don't do this sort of thing on a daily basis. :-P I certainly didn't come up with this idea. When I decided I wanted to try it, I took to the great interwebs to try and learn how it was done. Some things I found were helpful and some were not. Anyway, I hope this is at least somewhat informative and/or amusing.
So, what sort of equipment does one need to achieve this effect? Well, I'll tell you.

First, of course, you need to choose a setting where you'll be doing your levitating. It also helps to have some sort of costume that helps explain what you're doing floating in this particular setting. Obviously you don't need to wear anything special, but it helps to tell a story. :) It also helps to do a little bit of acting (which is where the ridiculous facial expression comes in). You've got to sell it, people!
Also important are the objects on which you will balance yourself. In this case they were a large rock (which you see in the final image) and a chair (which you don't see, but we'll get to that in a minute). You levitate with only one object (or none, if you want to catch a photo of yourself jumping in mid air). In this case I used the rock because it was part of the story I was telling and I sort of thought it would look cool if it appeared that my head was the only thing keeping me off the ground.
A tripod is a useful way to get your camera in the proper position, but if you've got a more efficient way, then go for it! Last but not least, a remote control is invaluable in this process, as it allows you to focus the camera without being behind the camera and also lets you control when the picture is taken.

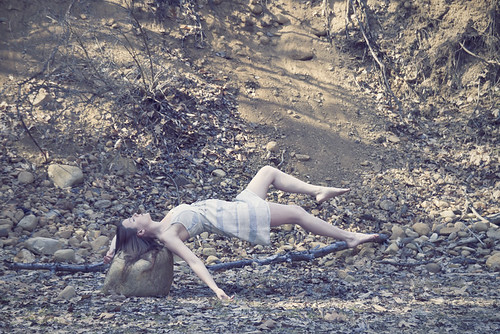
As you can see here, I eventually changed my mind about wanting to step off the large rock into mid air in favor of resting my head on the rock as if I were sleeping. Unfortunately, being in this position meant I wasn't exactly where I needed to be so that the camera could focus on my head. Hence, another ridiculous affectation. We do what we must for creativity's sake. :)
By the way, this is what a finished version of the original idea could have looked like:

So, once I had my preferred pose figured out, I took a bunch of shots to try to get a position that would be interesting and really sell the whole floating thing.

One last thing I needed before I could pack up and go home was a picture of my background setting without myself or the chair in it. That was a little tricky in this situation because it was late afternoon and the light on the background behind me was constantly changing. Thankfully I noticed this and was able to take several background shots through the course of my photo shoot.
Having a picture of the plain background meant that later, in Photoshop, I could open the file with myself in the picture and the one with just the background, layer the one of me on top of the background shot, and then erase the pixels making up the chair, showing the empty background underneath, like so.

Once that was accomplished, I just added a little extra Photoshop magic (a whole other story, trust me) to make it look more interesting, and there you have the final product. Yippee!
Whoa. That turned out to be a little more long-winded than I expected, but I hope it was helpful. I'm happy to consider requests for other how-tos. If you care to, feel free to check out the rest of my work here and let me know what you think! Thanks for stopping by. :)

Very informative. I had no idea. I'd love more posts like this.
ReplyDelete